- 16Jun2015
-
How to Browse and Select File and Folder in VBA
Browse and select file in VBA :
Sometimes, we may need to work with external files in Microsoft Excel. We might need a button in excel to open windows file dialog box so as to select the desired file. To achieve this we need to write the following code in VBA editor.
VBA Code Snippet:
There are two steps in the code snippet.
Step 1: Choosing the file
Here we are using “Application.GetOpenFilename” to open the windows file explorer and we mentioned the filter as xlsx files only. This will show only the excel files. We can use the filter based on requirement to show other file types such as .txt, .xlsx, .docx
For Example, if you are interested in selecting the PDF file then change the code accordingly
Application.GetOpenFilename(“All PDF files (*.pdf*), *.pdf”, , “Please choose file”)
In the end we use “Please choose file” as title for the dialog box.
Step 2: To display the file location
This is an optional step to display the file location to the user. In this example, we are putting the selected file location as text in the cell A1
To select multiple files:
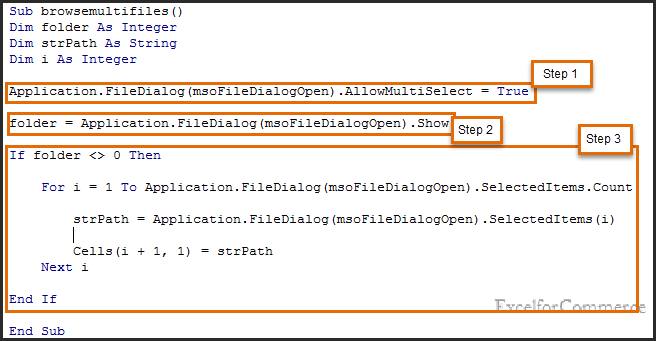
We can select multiple files in VBA. To do this, check out the below given snippet.
Step 1: This will allow the user to select the multiple files
Step 2: This will open the File explorer dialog box
Step 3: Here, we are storing each file name into the string ‘strpath’ and putting that into the cells from row 2 to until the selected files count.
Browse and select folder in VBA:
At times, we may need to select folder which contains the input files in Microsoft Excel. We can achieve this by writing the following code in VBA editor.
VBA Code Snippet:
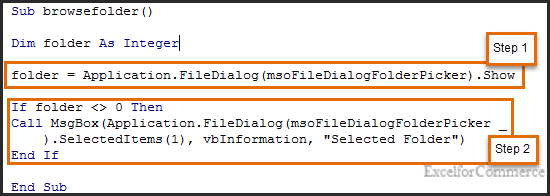
Step 1:
“Application.FileDialog(msoFileDialogFolderPicker).Show” will open the File explorer dialog to open select the folder.
Step 2:
If we select the folder then the folder count will not be zero and the selected folder will be shown as a message box.
To get the selected folder location in a cell:
Take the selected folder location into a variable after folder picker.
strPath = Application.FileDialog(msoFileDialogFolderPicker).SelectedItems(1)
And assign it to the desired cell in excel
Range(“A1”).Value = strPath
Getting list of files in a folder:
Below is the vba snippet to get the list of files which are in a folder.
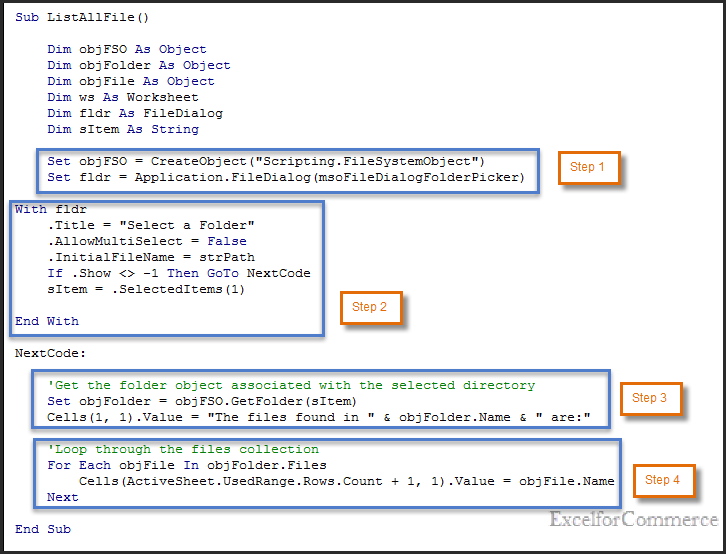
Step 1:
After declaring the variables, let’s create an object as objFSO. The File System Object (FSO) model provides an object-based tool for working with folders and files. The following code illustrates how the FileSystemObject is used to return a Text object that can be read or write.
Next statement is to set the folder. Here, we are using “msoFileDialogFolderPicker” to set the folder location.
Step 2:
In step 2, we are selecting the folder from the Folder Picker and taking the path of the folder name into “sItem” variable.
Step 3:
Here, we need to get the folder object associated with the selected directory by using the statement
“Set objFolder = objFSO.GetFolder(sItem)”
Below statement is used to put a header stating the files found in the selected directory into the cell “A1”
Cells(1, 1).Value = “The files found in ” & objFolder.Name & ” are:”
Step 4:
Here in step 4, we loop through the files collection in the selected folder and populate the file names into the column “A”
“For Each objFile In objFolder.Files”
The above statement will go through the each file in the selected folder and populate the file names which is in object “objFile.Name” into the column “A”
Cells(ActiveSheet.UsedRange.Rows.Count + 1, 1).Value = objFile.Name
Still got doubts? Feel free to contact our Excel Expert here.
- 16 Jun, 2015
- Excel for Commerce
- 1 Comments
- Browse and Select File and Folder in VBA, Excel Consultant, Excel Expert,


Comments
-

-
Rahul Sharma
- Mar 22 2022
-
That was very helpful. Thank you so much.